This project for my front door makeover is one that I have been wanting to do for several seasons.
A beautiful front door transforms the entry to your home, adds great appeal and gives a pop of color to an otherwise bland and boring entry. 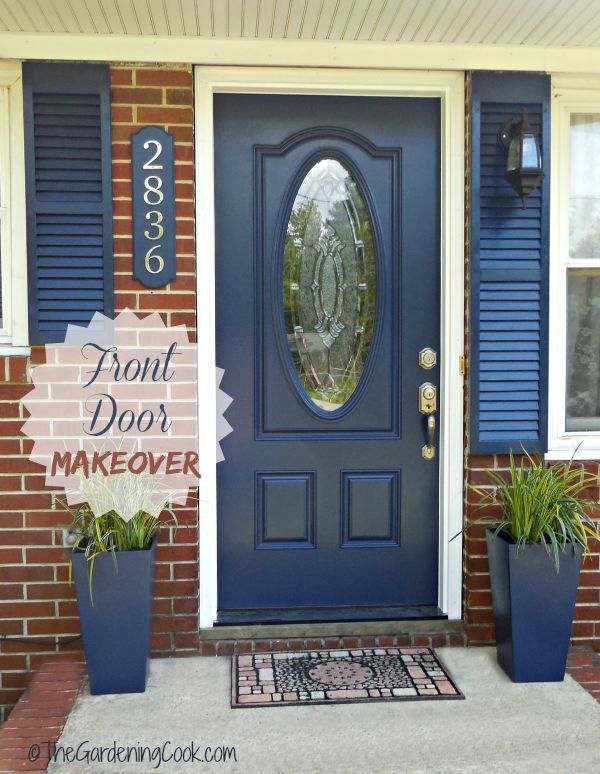
Note: Power tools, electricity, and other items used for this project can be dangerous unless used properly and with adequate precautions, including safety protection. Please use extreme caution when using power tools and electricity. Always wear protective equipment, and learn to use your tools before you start any project.
Add Great Curb Appeal to your Home with a Front Door Makeover.
The door color of my front entry door is perfect for seasonal decor. See how it looks for the 4th of July here.
My husband retired last June, and I finally can get his help on so many projects that I have been wanting to do to transform the look of our home. During the last few months, we gave our shutters and facelift by reversing and painting them.
We also added a new door light, power washed the whole house and gave our mailbox a makeover.
It’s now time for the front door to get a new look. (Hubbie is wondering why he ever retired at this point. He has never worked harder!)
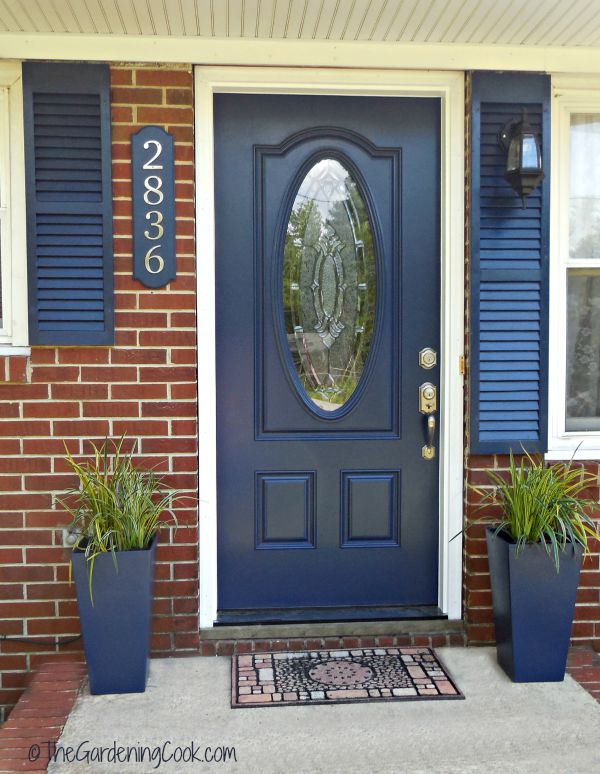
The front door was unsightly and added nothing to the look of the house. The door was rusted out at the bottom and had very boring hardware on it.
The brickwork, “welcome mat,” and entry step were badly in need of a power washing and it needed a new light fixture. 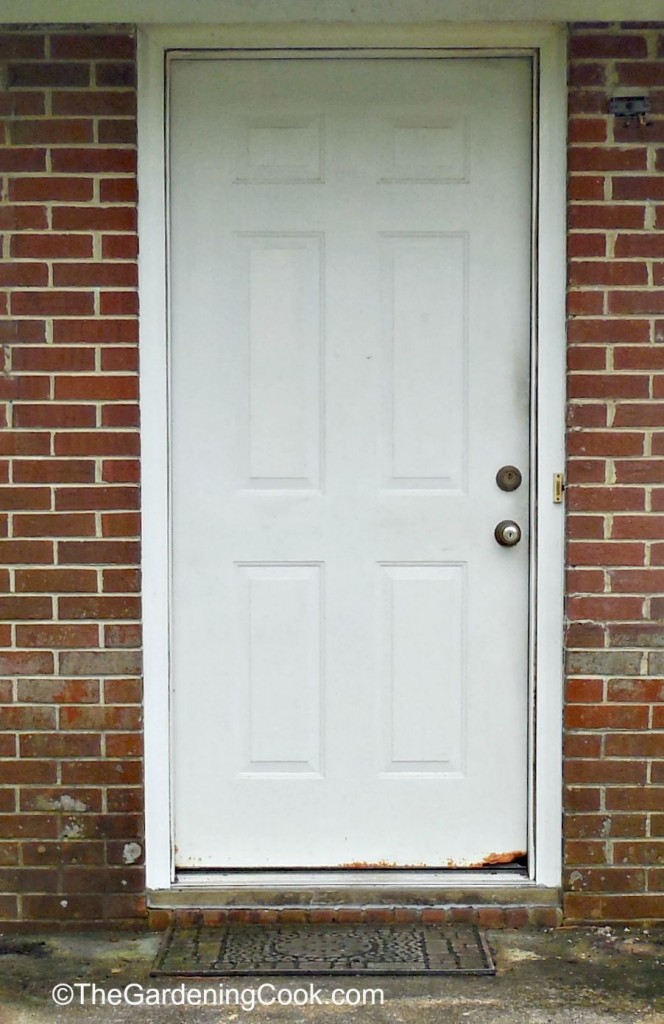 The first step was to cut down the boxwoods. They dwarfed our front step and made it seem much smaller than it really is. I had to convince my husband to cut them down. He is English and has a fondness for them.
Also, we use them at Christmas times for outside white lighting. (This was about the only time I actually liked them!)
Once convinced, he got out his chainsaw and tackled them. It took some convincing, but when we were done, they were miniature versions of the originals.
I promised him (with my fingers crossed behind my back) that they would grow again.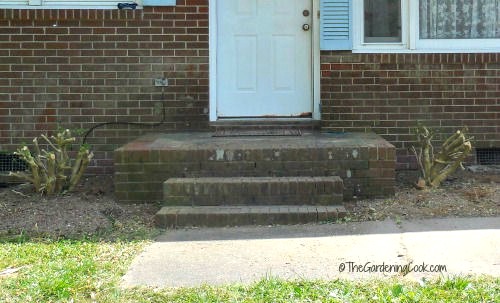 At this point, I kept coming in and out of the house remarking “I can’t believe how big this step is!” I even managed to get hubbie excited about the project (in between bouts of mourning for the loss of his beloved boxwoods.)
Alas, cutting the bushes down also showed us how dirty the brick work behind them and on the step was.
We borrowed a power washer from our friend Brian, and set about cleaning the step and brickwork. We discovered (to our horror and also our delight) that our front steps were a completely different color underneath the grime.
It is amazing what one can get used to and never really notice! I really didn’t give much thought to how it looks since I was so used to coming and going with it looking this way. The next step was to remove the nails from the siding which surrounded the door frame with a small pair of pincers.
The door that we had bought had a pre-hung frame, but we wanted to save the siding if we could, just to save expense on the project.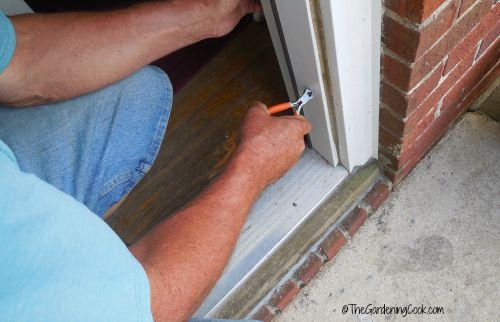
Next came a shopping trip to choose the style of door. I knew that I wanted two features of the door:
- that it would be blue in color to match my shutters
- that it would have some kind of glass panel in the center of it.
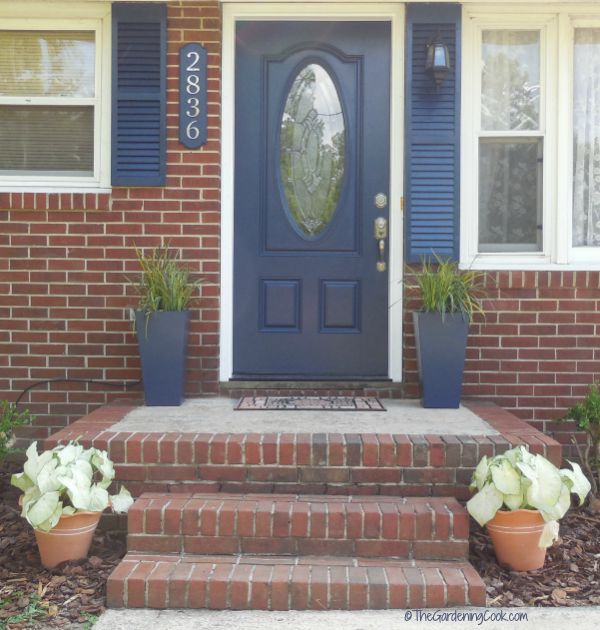
In the end, I chose a fiberglass door from Home Depot. The door is called Providence, is primed for painting, has a beautiful center, and I liked the panels too. I just love the look of the design. Now it was time to paint the door. I had recently done a makeover of our house shutters and the color that I used was Sherwin Williams Naval.
I had this shade tinted into a Behr exterior semi gloss paint. (I prefer Behr over Sherwin Williams paint.) Naval is a very dark blue color that compliments the color of our bricks beautifully. I wanted the door and shutters to match, so this is the color we chose.
I used a good quality small roller for the panels of the door and a 1 1/2″ paint brush for the trim around the glass center. Normally, I use dollar store brushes for many projects, but I wanted the finish of this door to be perfect so I bought good quality supplies this time.
We removed the trim from the door and painted it with Behr pure white paint. Our plan was to use the existing siding trim if we could but we wanted the door trim painted just in case this did not work out well.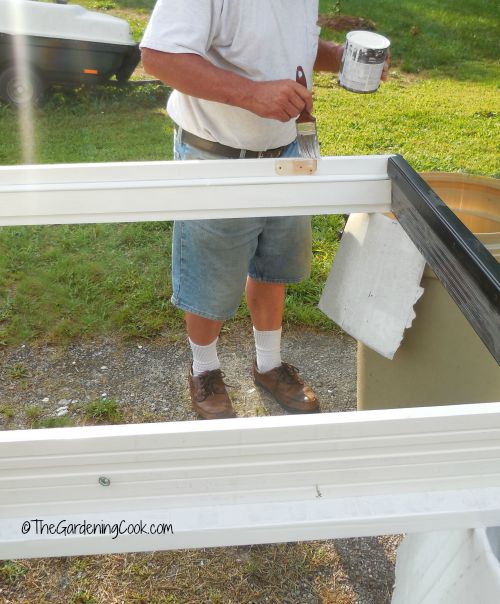
First, we taped the door panel with painter’s tape to make sure the paint did not get on it when we painted.
The outside was painted the dark blue color and the interior side was painted with the white paint to match the trim. 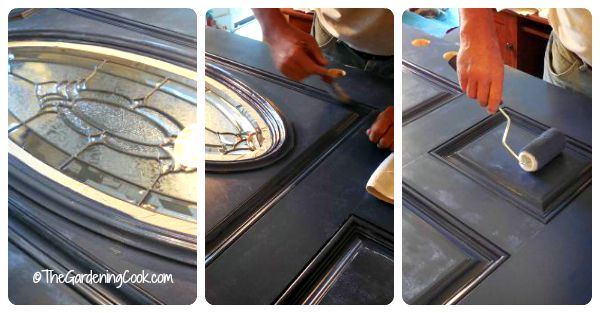 I researched a bit and discovered that the hinge side area should match the outside paint color, and the lock area side edge should match the interior color, so this is how we painted it.
This way, whichever way the door is opened, the edge will match the door color on that side.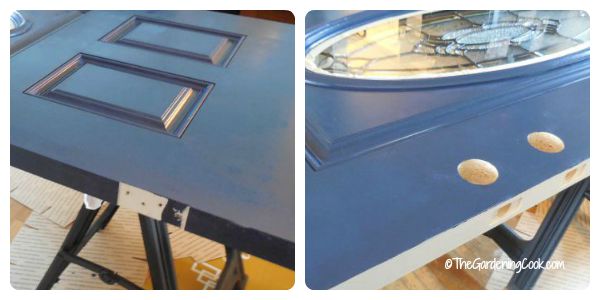 Once the door was painted, we had the job of installing it. This door is pre-hung at the manufacturer’s which made the job reasonably easy.
Our friend Norfleet came to our rescue for hanging the door. He has lots of experience doing this and we do not. Thanks Norfleet! The first step was to take off the old door casing and surround and remove the old door.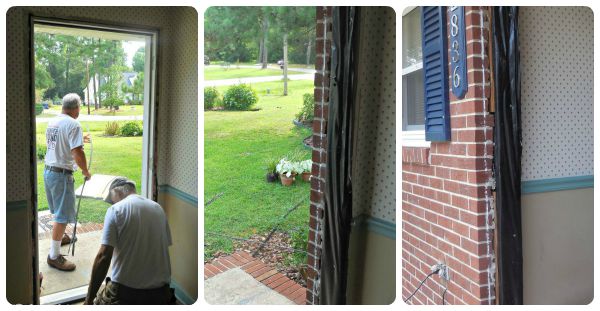 At this point the painted door had to be put back into the new door frame. It was just a matter of dropping it on the frame and putting the hinges back on.
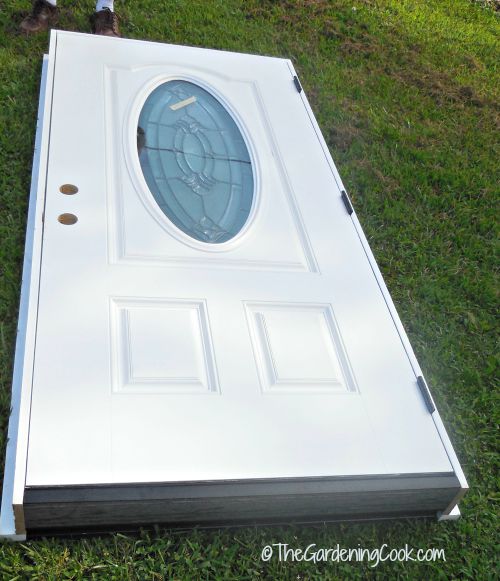 The door opening was measured, and we discovered to our delight that the door frame and our opening were a pretty good match.
We had to make a notch on the door edge for the doorbell wires, but this was easy with the help of a drill bit.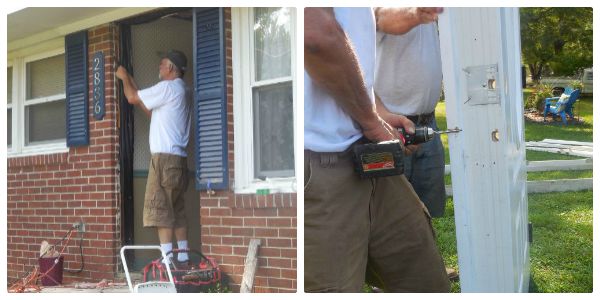 The guys carried the door back to the house, put the door trim back on after making sure it was secure with some shims on the side edges. Then the lock area had to be notched out a little to fit the hardware that we had bought.
 I love the way that the new door handle and lock is the same shape as the house number signboard that I recently made for the entry.
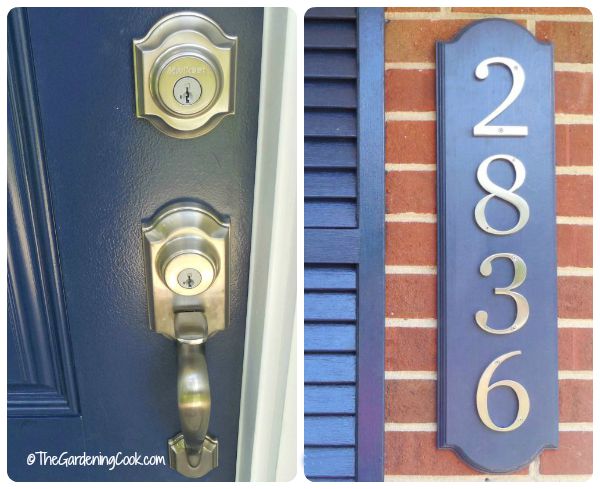 The whole door installation process took about 3-4 hours from start to finish, not counting the painting of the doors. I love the difference that it has made to the front of our house. Tons of curb appeal now!
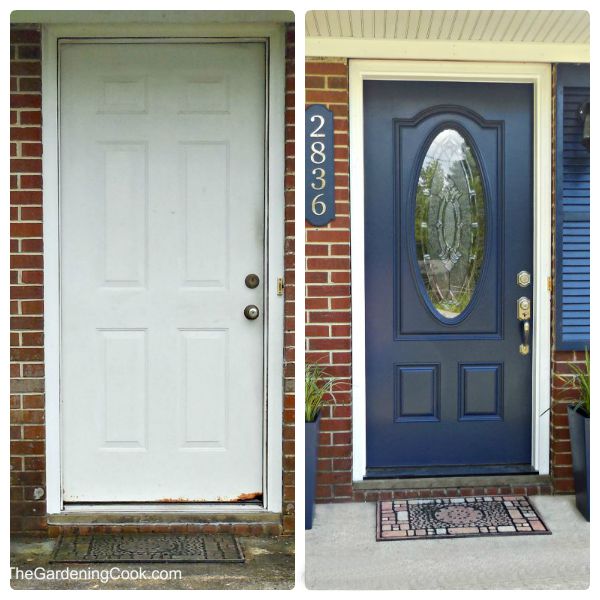
The last step was to attach the light to the shutters. A bit of measuring, drilling and attaching the wires and it was done.
The edges of the panels are a nice match for the edges of the glass panel of our new door.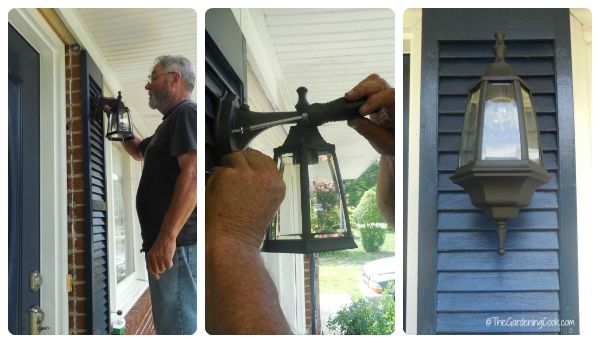
One thing that I did not expect is that the color that we chose would make such a difference to the look of the brick. We have considered painting the brick a light gray to make it look more modern, but I actually like it so much more now, so I am not sure.
We put the light upside down intentionally to make it easier to change the bulb, but re-positioned down and changed it so that it is upright!
 What do you think? To paint the brick or not?
59 responses to “Tips for a Front Door Makeover – Before and After”
Noooo! I don’t normally like brick particularly, but in this case it would make the blue look drab. That’s a fabulous color by the way!
Thanks Jacki. My husband is English and painting bricks is a sin to him, so it would take some convincing. LOL Carol
I agree with you jacki. Painting the brick would detract from all that lovely work with the door, shutters, porch light, etc. Leave the brick to harmonize with the house and let the new entrance be the “star” of the show.
Thanks for all your nice comments Vicki. Carol
Don’t paint the brick! Your house looks beautiful.
Thanks Deb. We decided not to~
What color is the house roof? I have a similar color scheme on my red brick house. We are in need of a new roof and I’m having a hard time picking a color.
The roof has been on the house for many years. I don’t remember the color name but it is a dark charcoal grey.
Completely agree, NEVER paint brick
Marvelous job! 🙂 Thing about painting brick, once you paint it, it’s almost impossible to remove the paint. So I don’t know if I would paint the brick before seeing it first. Here’s what I would do if this were my dilemma… Home Depot has something called Kingston Brick Paneling. It’s a faux brick panel, comes in sheets. You can see it here (but go to the actual store for a better visualization) http://www.homedepot.com/p/Unbranded-1-4-in-x-48-in-x-96-in-Kingston-Brick-Wall-Panel-278844/205683640
I would buy a sheet or two, paint it and set it up against the house next to the door. See if you can live with it for a few days before you commit to painting your actual brick. It will set you back a few bucks, depending on how many sheets you buy, but it will save you from the agonizing pain of trying to strip paint off your brick. Good luck! Whatever you do, I’m sure it will be fabulous!
Thanks for the tip Kristine. I will check it out. Carol
What color is the blue you used on your door and brand?
the color is called “Naval”
To echo Jacki, NOOOOOO. When those boxwoods re grow I’m sure you will keep them in line this time and all will be well. Better than well. Big difference, well done.
Thanks Lori. I’m tending towards no paint now. The whole look is growing on me day by day. Carol
Wow! what a transformation. and I LOVE the blue! It’s nice looking brick so personally I wouldn’t like to see it painted.
Hi Patches. Thanks for the nice comment. I can’t get over how much more I like the color of the brick now. That change has made all the difference. Carol
Leave the brick as is. Great job, looks beautiful. BTW, we have the same doormat. 🙂
Hi Mattie. Thanks! It seems to be the opinion that I don’t paint. Carol
I’m not clear on the paint. Did you have Home Depot make SW Navy blue from behr instead?
Hi Cindy. Yes, the Sherwin Williams paint was just horrible. We took it back and then took the color swatch to Home Depot and had them tint the Naval color with a Behr paint. It worked beautifully. Carol
We are getting ready to do this to our home I’m curious to know what you used in the power washer to clean the brick as cleaner ours needs to be refreshed it has a musty oder to it but dont know what kind of cleaner to use on the brick thanks
We use Simple Green as our cleaner.
@Carol,
So the color is Navel in SW? What made the SW paint horrible? Was it the color or the way it went on?
Yes the color is Naval in Sherwin Williams. The paint was way too thick and hard to put on. The Behr paint mixed to the same color went on perfectly.
I think that painting the brick would take away from the wonderful color pop that you have now. The reds in the brick complements the rich blue color on the door. I’d leave it as it is.
Great job.
Thanks Pee Gee. We have left it as is, at least for now. I do like the contrast, too. Carol
I hope you left the brick alone. Very pretty.
We did. We keep talking about painting it but my husband says he “isn’t ready yet.” LOL Not sure I am either! Carol
I love the door makeover! We are in the process of replacing our 17 year old front door too. It has rusted and the jambs have rotted. We ordered the same door with sidelights. I love the new hardware too!
We want to redo our homes look! Thank you so much for talking about matching the door with shutters! That would be something I wouldn’t think about, until it was to late! We also want to find someone who can help laying bricks, to give our home that nice look. Me and my husband aren’t fans of the look of siding. So we are excited to get creative.
Best of luck with your project Lilia. We love the door shutter combination! Carol
Looks great, and I would leave the brick as is. One small thing, that light is hung upside down.
Otherwise fabulous transformation.
Hi Tracy. Thanks for the comments. I realized that light was upside down when we put it up. It was easier to change the bulb. We’ve since changed it to the upright position. Carol
Hi I just wanted to say I Love the color and was thinking about painting mine the same. The only thing is my roof is red to so I was wondering what everyone thought about it. Do you think it would look good?
Hi Surina. I think it would look great. The naval color is a deep blue that would look wonderful with red. Carol
I love this Naval blue for the door and shutters. Our brick tends toward a terra cotta color. Would this blue look good with it?
Hi Lu Ann. It’s hard to say without seeing the actual color, but you can get a sample of the paint and put it on a piece of wood and hold it up next to your bricks to judge the way it looks. That is what we did before using the color. Carol
Love it!! Painting my daughters door and shutters this color very soon. Where did you get the planters and did you roller paint them to match? Thank You
Thanks Tricia. I bought the planters in At Home. They were black already blue but one was damaged and needed a repair. We painted them after the repair. (see the post here.) Carol
This looks great and I I’m using it as inspiration for my own house front makeover! I do have a question though, I know the trim right around the door is done in pure white, but it looks as if the soffit and other trim on the house is done in a very pale, soft yellow color. Is that so or is it just the way the photograph shows the colors? I am considering doing this very soft yellow color along with that deep naval color on my house, but I’m trying to find the perfect soft yellow tone. My brick and your brick looks to be identical. Thank you so much!
Hi Tammy. The trim on the soffit and other trim is part of the siding and window trim. I didn’t paint it at all. Carol
Thanks for the reply!
I love what you said about working with pre-hung doors in order to make the door installation process easier. Obtaining the right entry door can make your house more attractive, and it can definitely add property value. If I were to get a new door for my home, I would make a sincere effort to contact a contractor that could perform a smooth installation.
I like how you said that having a beautiful front door has a big effect on transforming the entryway of your home into something appealing. My husband and I want to increase the curb appeal of our home by making some purchasing and hiring some contractors. I hadn’t thought about replacing the front door, but I can now see how that will make a huge difference!
It’s good to know more about getting a front door. I love how you said that it’s good for adding some curb appeal! Our front door is old, so it’d be nice to replace it.
I have this type red red brick with white trim. We are putting a new roof on by Timberline in the color slate and want to change shutters and door to a dark green that would harmonize with the roof. What do you think. I like the blue but it would not go with the roof we have picked.
Hi Donna. It sounds lovely. We chose the color because our roof is dark gray but your’s sounds like a good choice too!
How has the paint held up? I’m planning to do our shutters this weekend.
Hi Crystal. It has held up well generally. The only thing that is a bit of a problem is the area around the oval where my door swags hang. Those get extra use since the swags sometimes move around on the paint. But the general paint job has held up well. On our shutters it looks perfect still. Carol
Thanks so much for the reply!
My pleasure Crystal.
Thank you for sharing.
Where did you get the planters?
I bought them at The Home Store.
Hi I just purchased a door pre-painted same color from Home Depot but I’m having such a hard time finding shutters to match! What kind of paint did you use for your shutters? Thanks!
The original color was called Naval by Sherwin Williams. I didn’t like the way the original paint went on so I had Behr tinted the Naval color and painted both the door and the shutters with it.
Thank you so much!
Paint the brick white. You will love it!