There are many retail products available for watering plants at the roots, but this Soda Bottle Drip Feeder makes use or recycled materials and works really well.
Drip feeders are a great idea for vegetable gardening projects. Many plants prefer the moisture at their roots instead of from overhead sprinklers which can encourage some leaf problems.
It is not just vegetables that will benefit from this project.
If you love growing perennials, you will know that some of them really like even moisture in the soil. The drip feeder is perfect for that!

Vegetable garden hacks are popular with budget friendly gardeners. After all, who doesn’t like to save money?
Soda Bottle Drip Feeder is a great DIY Project.
Watering from the root area instead of overhead encourages a plant to develop a healthy root system and prevents fungus and other problems that overhead watering encourages.
You can, of course, use a retail drip feeder hose for the task, but this handy DIY tip will help your plants and make watering an easy chore at little to no cost.
Some plants, such as tomatoes will get leaf problems if most of the watering comes from above the plant so root watering is best.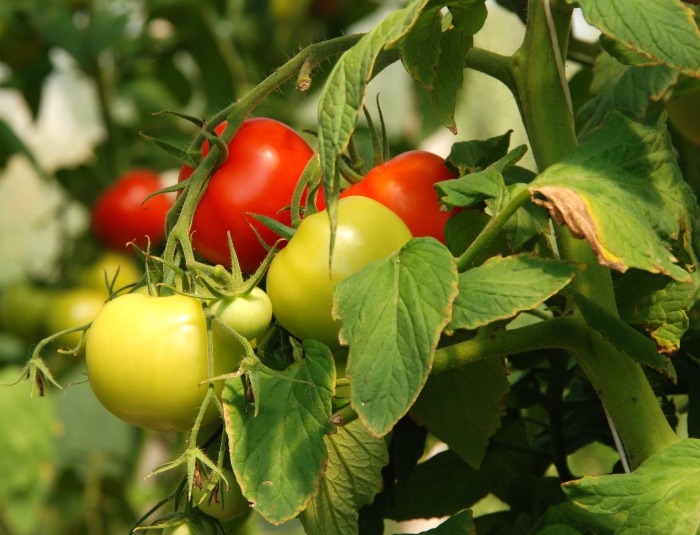
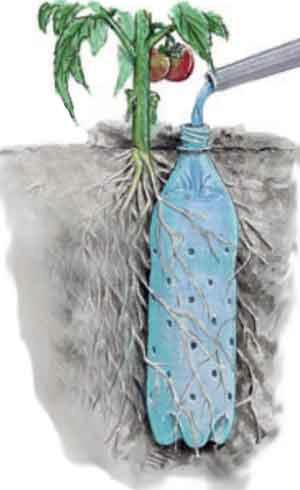
To make this soda bottle drip feeder, just take large 2 liter soda bottles (BPA free is best for this use on vegetables, but normal soda bottles are fine for flowers and shrubs), and use barbecue skewers to poke holes in them.
(I’d use less holes than this image shows so that it would be a very slow release, but it depends on how dry your soil gets.)
Insert the soda bottle into the space next to the plant when it is young and leave the top off. Leave the top exposed. When it gets empty, just top it up from the hose.
This is a great image shared from a Russian Gardening website that no longer exists but it demonstrates the project well.
The popularity of this post has been amazing. It is extremely popular on Pinterest thanks, in a large part to this pin which has gone viral a while ago. It has been shared almost 680,000 times!
Rain water is a great source of free water. Collect in in rain barrels and you will have extra pure water to use for adding to the soda bottle drip feeder.
I love anything that can help our environment, and this gives the best water, is economical and will be near by when the drip feeder needs to be refilled.

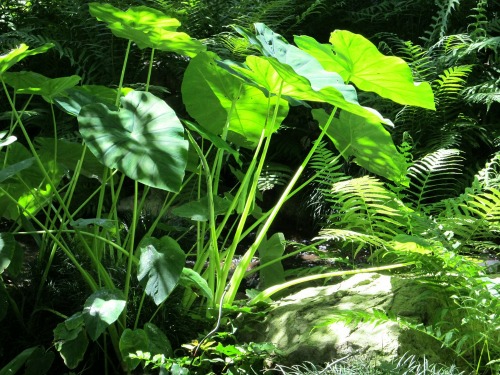
If you don’t like the idea of using plastics near vegetables, use it for watering plants like Elephant’s Ears, Canna Lilies, creeping Jenny and Ostrich Ferns. They love a moist tropical environment and will grow beautifully.
Note on the plastic bottles and chemicals forming:
I have suggested using BPA free plastics to use this project for vegetables and saving normal plastics for flowering plants. If the idea of using plastics (even BPA-free ones) still makes you nervous, here is an alternative solution suggested by a reader, Belinda, using terracotta pots instead.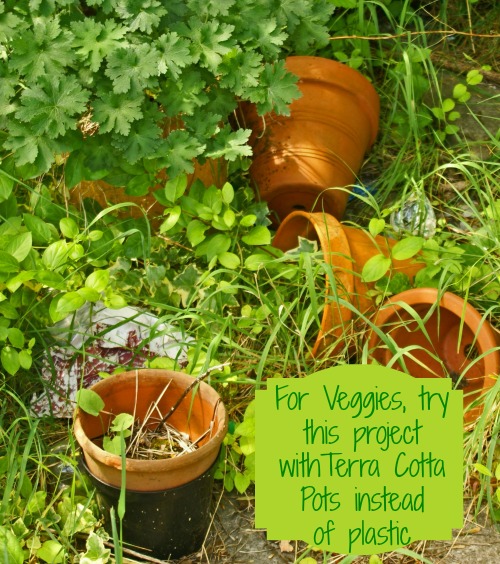
Drip Watering with Terra Cotta Pots
Belinda suggests doing a similar idea with 2 terracotta pots (un-glazed). To do this, just fill in the hole of one with waterproof caulking. Then, line the other make the hole a little bigger for easy watering.
Then you just seal the wide end of the two together, and then bury them next to your plants, leaving the top hole uncovered. Belinda uses a shard from an old pot to cover the hole after watering – and a funnel helps to water.
Because the terracotta pots are not glazed, the water will leak out slowly. This idea takes more room in the garden than a bottle because it’s wider, but it is a great idea if you are concerned about the possibility of chemicals from the plastic bottles.
You can adjust the pot size for the size of the plant you are growing and also how often you water.
Even inserting an un-glazed terracotta pot in the ground near plants will work, since the un-glazed clay will allow the seepage of water out the sides of the pot.
These alternative projects give readers with concerns about chemicals leaching out a great DIY alternative.
Reader tips for using this Soda Bottle Drip Feeder Project.
Many of my readers have made this drip feeder and tested it and have come back with some great suggestions on how to best use it.
Thank you to all the readers for your comments. Here are some of my favorite ways that readers of the page are using this idea in their gardens:
- Placing the bottle in a nylon stocking keeps most of the dirt out of the bottle.
- Milk bottles are larger than liter bottles and will water for longer than soda bottles.
- Insert a funnel into the top of the open bottle to make watering easier. (this sometimes catches the rain too!)
- Freeze the water in the soda bottle drip feeder first. It makes it so much easier to poke the holes. Thanks for this tip Connie!
- Marla, a reader of the blog, inserted a water meter near the roots and says that there is still moisture after three days of non watering in 100 degree heat! Amazing to know, Marla!
- Karla suggested this tip: Have smaller bottles filled with water to add to the opening so you don’t need a hose.

More reader suggested tips for drip feeders
Sterling suggests cutting the top 2-1/2″ from the soda bottle, flipping it over and putting it back into the bottle that was left from cutting with the top removed. This way, the main part of the bottle still holds the water and the upside down top acts as the funnel. and little will be lost to evaporation. Great tip Sterling!
Joyce suggests this: just cut the top off a smaller soda bottle & attach it as a funnel. Or use a 2nd bottle the same size, cut the top off & clip the screw-on part so it can be forced into the soaker bottle. These are all great ways if you have no funnel.
Jennifer did this soda bottle drip feeder with milk jugs last year. She says “One thing no one told me was to put a hole/holes in the very bottom of the jug. All my holes were about an inch from the bottom so there was always an inch of water sitting in the jug.
That inch of water grew algae and I lost 2 cucumber plants. Be sure to put some holes in bottom so it can all drain completely.” Great tip Jennifer!
Bob says he tried the soda technique and found it labor intensive. Instead he suggests this: Use a piece of PVC pipe with a funnel at the top to fill the bottle. And mark the bottle tops with something that they stand out so to make it easier to find when you go looking. You may also want to add liquid fertilizer during the growing season as needed.
Celesta suggests this: Try gluing your funnel into a convenient length of PVC pipe for your height. This will save a lot of bending to get the water into the neck of the bottle. It also makes it easier to spot in the garden too!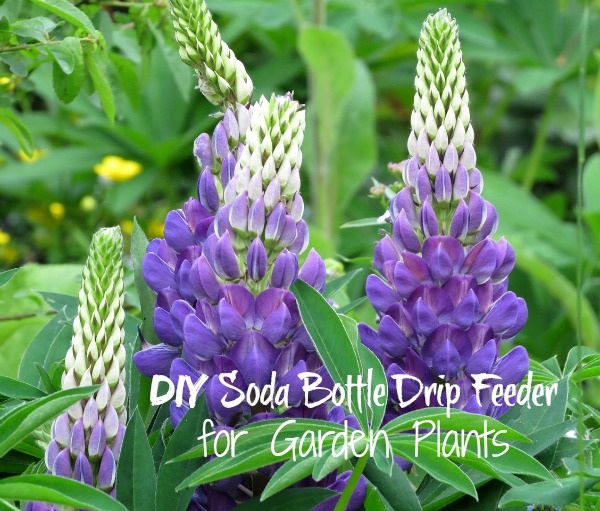
Jennifer suggests this tip for plants that do not like so much water. Poke a hole in the bottom fill and put cap on to adjust the rate of the drip(the tighter the cap the slower the flow) Jennifer also ties hers to the stake so they don’t blow away.
Wayne has an interesting tip for moisture on Tomatoes in general. He suggests mixing sheet rock from remodeling works for those with clay soils. He suggests mixing it with straw. This helps break down and loosen clay bound soils. You can also add sand from rivers. This should improve soil conditions tremendously.
Chrissy has a similar idea. She uses a 5 gallon pail, and drills holes all around and then she planted tomato plants all around it, and filled it with manure. Each time she filled the pail to water her tomatoes, the tomatoes received a healthy dose of poo stew. Chrissy ended up having massive tomato plants, and more tomatoes than she knew what to do with.
Thanks for this tip, Chrissy, and I absolutely love the term “poo stew!”
Sitting water can attract mosquitoes. Jess suggests this tip: When she does this in her raised vegetable garden, she leaves the caps on and unscrew them as needed. Otherwise I get mosquitoes hanging around and tree seeds in them.
It works amazingly well though. Tomatoes love it! Are mosquitoes a problem in your yard? Find out how to make a homemade mosquito repellent with essential oils, and learn about other mosquito repelling plants here.

Steve suggested using a large strawberry pot and to invert a bottle on the top. Plant in the pockets on the side and the inverted bottle will do the watering. This will work for smaller plants and make it much less time consuming than watering daily. He says he know it works since his plants are huge and blooming!
Sarah has tried this idea for years but finds it great for keeping her veggies watered but finds it time consuming for a lot of plants. This year she attached a hose the length of her tomato patch to her faucet then punched holes in the hose near each plant.
She then pushed flow-through Rain Drip adapters into the holes in the hose, and added a length of Rain Drip 1/4″ tubing to the end of each adapter. Finally, she put the length of tubing from the hose into each bottle.
Now, when she turns on the hose, the water flows from the faucet to the hose to the 1/4″ tubing and into the bottles deep watering ALL my tomatoes at once. It’s working GREAT!
Add your ideas for using this project in the comments below.
If you have tried this soda bottle drip feeder and had success, please leave your tips in the comments below. I will update the article periodically with your ideas.
149 responses to “Soda Bottle Drip Feeder for Garden Plants – Water Plants with a Soda Bottle”
this is a very good idea especially when their is a drought and it does not rain much.
I am going to try it with my tomatoes this year.
Bury Soaker hoses work great.
Would I just cut pieces/length off of an old hose and “plant” in container? Won’t the water just run out the end.?
I’ve got 5 tomatoe plants I plan to try this with
Hope it works for you. I’m doing it this year too.
We are in the 3rd year of a drought here, so this idea will work with the rain water that we catch from the drain pipe.
last summer was horrible for us with dryness. This year seems to be starting wet and cold but I’m sure that will change.
I am going this with 1 leter Gatorade Bottles and 1/2and 1gal plastic milk bottles for planters
hope it works for you. Make the holes very small.
Carol
I love this idea! would it work well with any plants?
Most plants would be okay. Some don’t like wet feet so it would not work for them. (succulents styles, etc)
What do you consider small holes, 1/8″? How many holes do you suggest?
I want to put down a Gulmohar tree near my baby grave but I don’t have any facilities for water in the graveyard can I do something with a 5 litter or 10 litter bottle please help
HI Janet. Any size water bottle will work, but this is not a permanent watering solution. The container does need topping up so having it near a water source is the best plan. Carol
Steve I am doing the same with non refundable plastic jugs. (milk, gatorade, some water and soda bottles and also very cleaned out bleach bottle) I also used funnels I purchased at the dollar store and inserted them into the tops of the bottles last year. Made it easier to fill and when we did have rain it did catch some to assist in the filling. I use this method in my container plants and hangers as well at our weekend cottage.
Love the funnel idea. Just buried my gal milk jugs with my tomatoes yesterday
ps another hint is to freeze the water in the bottles first then poke holes. Makes it so much easier to poke the holes and safer for you as well as not collapsing the bottle. You only need to do the freeze 1 time. After the holes are poked plunk them out in the garden
great tip!
awesome idea! thanks!
What a great tip from Connie.
Heat the end of a nail with a flame, it will melt thru the plastic jug easily, no need to freeze a full gallon of water.
I live in AZ and the heat always does my tomatoes in. Seen this idea early in the year and put them in when I planted the tomatoes. My tomatoes are looking good and I have a gauge to check moisture down by the roots. There is moisture after 3 days of not being watered. That is with 100 degrees! I am very pleased. The idea of someone putting a funnel at the top will help. I wonder if just cutting the bottom off and put the screw top in first would work. Will try that.
if you did it that way, the potential for the water to evaporate quickly is there. instead, maybe try this. cut the top 2-1/2″ from the sada bottle, flip it over and put it back into the bottle that was left from cutting. with the top removed. This way, the main part of the bottle still holds the water and the upside down top acts as the funnel. and little will be lost to evaporation.
Good tips Sterling!
hi carol,thank you for sharing.
Another great tip!
Why not just cut the top off a smaller soda bottle & attach it as a funnel? Or use a 2nd bottle the same size, cut the top off & clip the screw-on part so it can be forced into the soaker bottle. All kinds of possibilities.
Good tips Joyce. Thanks for sharing them. Carol
STERLING you have great ideas to make better an already excellent concept!!!!!!!!!! Thank You!!!!
Awesome , I think tis will solve my yellow leaf prblem. Thank you fr this post.
my pleasure.
I did this last year with milk jugs. One thing no one told me was to put a hole/holes in the very bottom of the jug. All my holes were about an inch from the bottom so there was always an inch of water sitting in the jug. That inch of water grew algae and I lost 2 cucumber plants. This should work great if you put some holes in bottom so it can all drain completely.
Another great tip. Thanks!
thanks for this post! i wouldn’t have thought of it!
Gosh, there are some smart gardeners on this site.
I would like to try this with a couple young trees and see if that works. Living in Arizona and heading into the hottest part of the year, I think this will help the trees tremendously.
I have used large bottles with holes in to use with newly planted trees for many years,
they work well, I use two liters of water every second day to start with to encourage new roots. Will try using the bottles for my tomatoes come spring – it’s winter here in New Zealand now.
Hi Anne. I lived in Australia for 15 years. I remember well the opposite seasons! Carol
I tried this a few years ago to water my tomatoes and it turned out to be a lot of work. I had several 4X4 beds between bending over, finding the bottle neck and getting the majority of the water in the bottle was more than I wanted. IF I were to do it again I would suggest a piece of PVC pipe with a funnel at the top or (less desirable) some plastic tubing with one end in the bottle and the other end with a funnel. Also mark your bottle tops with something that stands out so it is easy to find when you go looking. You may say I just want to water my plants that is fine. However you may also want to add liquid fertilizer and other stuff during the growing season as needed.
Happy gardening…
I wanted to clarify a little. My suggestion is for one piece of PVC to fill the bottle not one for each bottle unless you happen to have PVC laying around.
thanks for the tips Bob. Always great to hear one way or another how a suggestion works for readers.
Carol
Why not just use PVC pipe so it sticks out of the ground enough and your hose can fill directly . It can be more expensive but in the long run if placed properly among plants will take care of more then one plant.
PVC is a “bad” plastic. If you are organic a definite NO GO.
I’d rethink using PVC in gardens.
A very cheap way to save Expensive $$ 🙂
i absolutely love this idea! thank you! can’t wait to try it this year!
HI Holly. Glad you like it. There is nothing like water right to the roots!
Carol
When do you plant the bottle at the same time as the plant you are growing?
That would be ideal San, otherwise, you will disturb the roots if you try to do it later.
Yes and mark the spot where the top of the bottle is .
Great idea. Tks for posting.
🙂
I have physallis, goji, blueberry, raspberry…
Is it ok with this plants?
I would think that it would work with all plants except for those that like to be kept dry.
Carol
🙂
Tks
I will be using this in a large container I have at my seasonal campsite for growing a few veges as I am only there once a week. This will insure the plants stay watered
I would think that while the plants are small, one would need to add a little extra water right to the soil, since the roots will not extend down very far yet, so all the water will drain out below where the roots are.
Yes I agree Gay. I’m thinking of the more for somewhat established plants. Carol
I am a 74 year old retired aircraft painter living in Fla. raised on a farm if they knew of this back then the whole world would be better today Thanks for sharing love your little sites
RED
Can I place multiple plants around one bottle?
You could try more than one, but I doubt the water amount would do much good for multiple plants.
Carol
Try gluing your funnel into a convenient lenth of PVC for your height. Saves a lot of bending to get the water into the bottle neck.
Great tip Celesta. Thanks!
Carol
Watering from the bottom encourages roots to grow deep for a more healthy plant. Top watering makes for shallow roots and more disease prone
When it is time to ‘feed’ your garden, can you put liquid feed right into the bottles instead? I’m thinking you would have to only put a small amount of the feed in as to not overwhelm the plant. Has anybody tried this?
Hi Cindy,
I don’t feed my tomato plants with anything other than compost but I don’t think putting fertilizer in the bottle would be a good idea. It would get too close to the roots, I think, and might burn the plants. Carol
I wonder if you put manure in the bottle as well, if it would act as a slow release fertilizer
I keep water in my kitchen compost scraps bucket to reduce smell, and drain off the water on container plants. Could do the same for this, or even make formal Compost Tea (I guess mine is Compost Stew). I have buried scraps under new plants before to feed the plants, which I call Direct Composting. I imagine could put small scraps in a wide mouth bottle also. I found this while researching Ollas -something I just learned about today. The clay pot idea qualifies, if you cork the bottom hole. Apparently, water seeps out via capillary action and after the earth around it is saturated, no more water will leave the Olla so you don’t over-water. Good for drought areas like mine.
Great tips Franki. Thanks for sharing. Carol
It sounds like a very good idea but I am a little concerned about the holes filling with dirt blocking the water from dripping in the ground. Anyone had problems with their holes getting clogged?
Thanks!
I think the water would just seep through even if dirt got into the holes. Carol
Yes, the holes do stop up and it’s nearly impossible for the water to seep out. Suggestions??
Hi Faye. The only thing I can think is to make the holes a bit bigger. It may have something to do with the type of soil that is a bit heavier than mine perhaps?
Carol
How about wrapping the bottle with landscape fabric to prevent the holes from clogging up?
That is a great idea!
Try using coffee filters
I drill holes in half gallon milk jug.The holes are on the side next to the plant.I also dig the hole big enough for the plant and the jug set the plant & jug in the hole and fill in around them leaving a little of the neck of the jug sticking out of the hole.
Hi Bobbie. Thanks for the tip. Gallon jugs would probably work too and would hold more water. Carol
And for those plants that don’t like wet roots…poke a hole in the bottom fill and put cap on to adjust the rate of the drip(the tighter the cap the slower the flow) I’ve tied mine to the stake so they don’t blow away 🙂
good tip Jennifer.
This is slightly off subject, but I am watering some inside plants from the bottom.(I have a thirsty cat so not all are done this way..) Question is how often do I add water, do I let it run dry or keep mostly full? One small plant is up high and sucks up water instantly as is full of young parsley, which get transplanted tomorrow am. Great site. Love all the hacks!!
Hi Abbi,
It really depends very much on the plant. Some need more than others. My rule of thumb is to poke a finger into the soil. If it dry down to the first knuckle, I water it.
I try not to let plants sit in water in the saucer, as this can rot the roots of most of them.
Carol
Am going to try this with my tomatoes.
Will this work with outside annuals & perennials as well as veggies? I have lamp posts that don’t get hit by the sprinklers that are surrounded by flowers.
Hi Ceil. Yes it will work with any plant other than those that like dry conditions. It’s really just a home made drip feeder.
Carol
When I do this in my raised vegetable garden, I leave the caps on and unscrew as needed. Otherwise I get mosquitoes hanging around and tree seeds in them. It works amazingly well though. Tomatoes love it!
Great tip Jess. Thanks for sharing. Carol
Hey Jess,
Did you fertilize your tomatoes through the bottles? If so was there any issues?
Thanks
Joann
hi Joann. No I didn’t do that. I think I might be concerned about the amount of fertilizer near the roots, so wouldn’t suggest it. Carol
I wonder if putting like toll around the opening would help with mosquitoes and debris?
This idea may appeal to some but I think there are better ways to water/maintain hydration to the garden. Not a real fan of burying plastic w my awesome veggies. Some how my grandmother who had several gardens over her 106 years never resorted to this. Would rather use organic mulch, from nature /barn cleanings. Jmo
Has anyone considered the chemicals that will leach into the soil from the plastic? If you are growing organic food, that would matter.
I am at the planning stages of my garden now, but it is occurring to me..
1) what about if I bury a larger bottle with the holes just as suggested (each in the respective locations),
2) then have a second smaller bottle(s) in my gardening desk/bench that would fit inside the buried one.
3) Fill all the bottles needed with water and fertilizer (if),
4) then put them inside of the buried plastic bottle?
That way, I don’t have to go around with my hose filling each plastic bottle? May sound like a circus.. but as I work full time and still want to have a nice garden, I would need to optimize my watering time as much as possible.
Also, the buried bottle could have a nice bamboo stick for reference, just to make sure it is not lost between the veggie foliage.
Just saying.. 😉
Hi Karla. Great idea. Anything that saves time is a winner for me. Carol
My youth group and I are going to plant a garden this spring. We’re going to plant some tomatoes and other vegetables in straw bales. Would this be a good way to water in straw?
Hi Jan. I have not tried growing tomatoes in staw, but it is supposed to conserve water. This method would work but might need less water than tomatoes grown in soil.
Carol
I think this will work with my cucumbers. The last couple years I have had trouble with mold my question how many water bottles per area? Should I have one per hill or one per plant?
Hi Kim. I have not tried this with cucumbers but I should think it would work for any plant that likes moisture at the root area. Not sure on the number of bottles, but one bottle does not hold much water, so I would not think that one would do a whole hill.
Carol
This will be perfect for when we’re traveling. I love to garden, but don’t like to ‘babysit’ my garden all season long. Using this method will free me up for small road trips and such. : )
This is an awful idea for growing anything you plan on eating! I wish people would stop touting it as a great idea.
The heat from the soil and repeated addition of water will cause petrochemicals from the plastics to leech into the soil and into your vegetables.
Why do you think we’re advised not to reuse plastic bottles more than a few times?
I love this idea but not sure what plants I should not do this for.
Do you have an idea? I plant peppers,sweet potatoes, corn, zucchini, green beans, tomatoes, carrots.
Hi Carol. I would not do it for root vegetables like potatoes, carrots, beets, etc. But above ground plants normally need quite a bit of water and could benefit from this. The key really is to keep the water off the top of the plant and near the roots where it belongs, to help maintain moisture and prevent disease.
Carol
We have clay soil that gets deep cracks in the summer time making it hard to water anything because it runs into the cracks. Its especially hard to get a tree going. Last year I planted a tree and put a 2″ pvc pipe into the ground while planting. It has about 3 feet above ground and a foot below. Last summer I often just put the water hose into the pipe and filled it to overflowing. I am proud to say that tree is leafing out beautifully right now. We made it!
Hi Patricia. That’s a great idea…very much the same technique. Glad to hear your tree is doing well. I have to deal with clay soil too. Makes it hard!
Carol
Sheet rock from remodeling works for clay soils, mix with straw or hay. Helps break down and loosen clay bound soils. Can also add sand from rivers. When mixed with big tomatoes compost should improve conditions tremendously.
I’ve done this with 2 terra cotta pots (unglazed). Fill in the hole of one with waterproof caulking. In the other make the hole a little bigger for easy watering. Seal the wide end of the two together, and then bury next to your plants, leaving the top hole uncovered. I use a shard from an old pot to cover the hole after watering – and a funnel helps to water. Because the terra cotta isn’t glazed, the water leaks out slowly. It takes more room in the garden than a bottle because it’s wider, but it’s all natural if you’re worried about chemicals. You can adjust the pot size for the size of the plan you have and how often you water.
Hi Belinda. LOVE this idea. Many people have commented on the use of plastic, so this is a great alternative! Carol
I have done this before, I used a 5 gallon pail, and drilled holes all around it…planted tomato plants all around it…and filled it with manure. Each time I filled the pail to water my tomatoes, the tomatoes received a healthy dose of poo stew. I ended up having massive tomato plants, and more tomatoes then I knew what to do with.
What a great idea Chrissy. I love the term poo stew. Too funny! Carol
hi,
I used this method this summer (Australia), I found that you get better seepage from many small holes rather than larger. I made the holes with a hot needle which did the job well.
I “planted” the smaller bottles right in the middle off hanging baskets of lettuce, I would add it’s important to water the soil around the bottle from time to time.
I used 20 oz soda bottles and a hot soldering iron to make the holes. Goes through like a knife in soft butter.
I also hooked it up to my drip system. I used a flag dripper and ran a 1/4″ tube down inside the bottle. I left the cap on and melted a hole in the top big enough for the tube to get through. No worry about refilling.
great tips Jon! Carol
this is terrific, pinned to my in the garden board. Thank you for sharing at the Thursday Favorite Things blog hop xo
Thanks! Glad you liked the article. Carol
I will like to get a lot of those comments I will like to start my own gardening I am new in Georgia and the weather is not good for planting my veggies in my patio THANK YOU
My pleasure Myriam! Carol
Have used the square juice bottles for my tomatoes and pepper plants for last 5 years. Just cut the bottoms off, drill several small holes near the top of the bottle, plus one for the cap. When planting, put the bottle next to the plant, upside down of course, with the predrilled holes facing the root ball. Leave about 2 inches of bottle above the soil to keep most soil out plus the bottle is visible all season. Excellent way to water just the plant and to add fertilizer to the plant where it needs it most (roots).
TIP: Plant your tomatoes on a slant, remove most of the leaves except for the top cluster. The buried stem will send out a lot of extra roots making for some really large Tomato plants. Planting on a slant keeps the tomato plant in warmer soil in the spring. Planting vertically puts the roots in colder spring soil. Tomatoes are warm weather only plants.
Great tips Dave. Thanks for sharing.
Even though I make only 2-3 holes and use pin to make the holes, my problem is that all the water drains away immediately. Any suggestions will be appreciated. Thank you
Hi. the only think I can think is that the holes are too large or the soil is very light. Either would make the water drain quickly. My soil is fairly heavy so it works fine. Perhaps use a smaller item to make hour holes? Carol
Looks like a good idea, might do this to help with those really long dry spells!
These really do work great and your tutorial is excellent!
En ce qui concerne le système d’arrosage des pieds de tomates ,à mon très humble avis il me semble ardu de remplir une passoire d’eau!…
Bien cordialement
Le sol retient l’eau de sorte qu’il infiltre. Les trous doivent être très petites.
I’ve done this for several years and find it very helpful keeping my veggies watered. I find filling the bottles to be somewhat tedious, so this year I used a hose the length of my tomato patch to my outdoor faucet. I used the hole punch from a Rain Drip irrigation system and poked a hole in the hose for each tomato plant. I pushed flow-through Rain Drip adapters into the holes in the hose, then added a length of Rain Drip 1/4″ tubing to the end of each adapter. Then, I put the length of tubing from the hose into each bottle. Now, when I turn on the hose, the water flows from the faucet to the hose to the 1/4″ tubing and into the bottles deep watering ALL my tomatoes at once. It’s working GREAT!
I’ve tried using a Rain Drip irrigation system multiple times in the past, but haven’t had a lot of luck with them, so using spare parts I already had and not using drip heads is MY solution.
Excellent suggestions Sarah. Thanks for sharing.
This idea works well in a 12 pocket strawberry pot, with a smaller bottle inverted on top. No need to water the plants individually on the outside. I used big holes (1/2″) all around, filled the bottle with vermiculite, and buried it. I know it’s working…. the plants are huge and blooming!
Great idea Steve. Thanks for sharing it.
My mother would definitely love this. She loved planting tomatoes and this idea is absolutely genius!
Thank you for sharing your awesome creativity and for your helpful idea.
Hi James. Thanks for the nice comment. Glad you liked the article. Carol
Admiro tu website, sinceramente es lo mejor que he encontrado en la web, la manera en que se comenta cualquier artículo y la respuesta inmediata a las inquietudes. Carol te felicito. te doy mi like. Me gustaría oir tu opinión sobre el cultivo de tomates invertidos en macetas. Dicen que es fenomenal. Saludos desde Guayaquil-Ecuador–Amèrica del Sur.
Gracias! Carol
Yo utilizo otra botella perforada enterrada antes, de diámetro algo mayor como contenedor vacìo , y otra perforada de color oscuro de diámetro menor como reservorio. Así como palos testigo de madera (como los de helado)que los entierro para observar la humedad que existe en la maceta. Así determino la cantidad de humedad presente.
Esto suena como una buena idea
Thanks for your tips! Those modifications sound really pretty and a bottle would be much easier to cut, making it a better craft for those with limited tools or time.
Glad you liked the project!
[…] This drip feeder helps direct water to where plants really like and need it. Making and using it will also save you money and protect the environment, as you’re using a recycled bottle instead of buying something from the store. via thegardeningcook […]
One person noted that to improve clay soil to add sand. This can make soil turn into concrete-like ground. Not the best choice.
I agree that leaving on the bottle caps is a good idea. Last Christmas I purchased a long funnel for watering the Christmas tree. That would work well for filling the bottles.
I need one of those funnels!!! Carol
Hi there ! What did I do wrong. or is that normal for a drop water feeder ? I just planted my tomato in my green house, with a drip water feeder like this one, but with less holes in it. When I fill it up, it get empty straight away… So is that normal ? What did I do wrong ? Thanks
Hi Domi. The only thing I can think is that the holes in your bottle are too large or that you have too many of them for the size of the bottle.
Hi, I just found this article through Pinterest and I love this idea! But how do you know if the plastic bottle is BPA free? I live in Texas so in the summers it gets in the high 90s to the 100s. Any suggestions on about how many and how big to make the holes? Thanks so much!
This article gives an idea of determining if a bottle is BPA free. The holes should be small (nail or skewer size. It’s hard to say how many until you see how quickly the water drains out (based on hold size. Start with just a few on the sides and add more if you feel the plant needs more water.
Carol, we’re embarking on our first garden this year, and I plan to use this idea…thank you! One more little idea I had reading through the comments is to stick those utility/sprinkler flags in each bottle to make them easy to find. I can see how they might become difficult to find with vegetation and mulch. The wire stem might rust a little, but should just add minuscule iron to the water. And oil funnels from the auto parts store are bigger than kitchen varieties (but don’t reuse ones that have already been used!). Regards, Mary
Best of luck with your garden Mary. I hope the idea proves useful to you. Carol
what about the long time effect the plastic may have on the soil as plastic is bio degradable
Hi Simo. Some people have commented that this is an issue for them. That is why I also added the instructions to use clay pots as a variation of the plastic. Carol
I tried various methods for punching holes in my soda bottles with little success. I was about to give up on the idea when my mom gave me a small jewelry awl. Super easy!
Great idea Bethany.
I’m having a heck of a time sourcing terracotta pots that will work as ollas. (all the ones I have – and bought! don’t ‘weep’ I’ve tried all the box stores and all my local nurseries any suggestions would be great. I’m trying to grow watermelons and squash so if anyone knows if the commercially available water nannies will work (root depth and water need) I’ll try anything at this point.
I tried various methods for punching holes in my soda bottles
This method really works thanks for sharing